Getting up and running with RabbitMQ (especially when using MassTransit) is a breeze. It may not exactly be the NancyFX Super-Duper-Happy-Path™, but it comes closer to it than any other ServiceBus/Broker I’ve come across.
However, the first time I laid eyes on the RabbitMQ guidance for Distribution, High Availability, and Clustering I started thinking that maybe this wasn’t such a good idea..
Anyway, a few days ago I finally spent a couple of hours together with our Ops guys building a lab environment. Turns out that setting up a RabbitMQ cluster on Windows Server isn’t that hard after all, but we did run into a few gotchas along the way. Thought I’d share the experience with you!
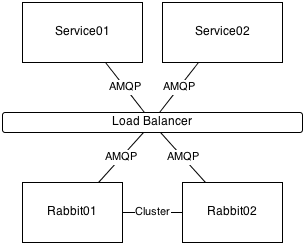
High Level overview of the setup
We decided to use dedicated virtual machines for running the Rabbit cluster. The alternative would have been to run it on the same boxes that run our application services, but somehow it feels better to have it separated. I’m sure you can argue pros and cons here, but I’m going to leave that to someone else.
The RabbitMQ boxes have a load balancer in front so that the application services don’t need to know which physical machine(s) to connect to. The load balancer is currently configured with a simple round robin algorithm and will automatically remove non-responsive machines from the rotation.
Installing
First thing to do is to install Erlang and RabbitMQ. Just get the latest stable versions from erlang.org and rabbitmq.com. By default, RabbitMQ installs its database in the %APPDATA% folder of whoever installs the service, something that seems far from ideal when in a server environment. So before running the installation we made sure to set the %RABBITMQ_BASE% environment variable to a more appropriate location (for us it’s d:\RabbitMQ). Other than that the installation is just a matter of doing the Next->Next->Next->Confirm dance.
Next we want to enable the management web interface. This is done by first enabling the plugin:
rabbitmq-plugins enable rabbitmq_management
Next, the changes has to be properly applied by reinstalling the service:
rabbitmq-service stop
rabbitmq-service install
rabbitmq-service start
You can make sure that the management interface is working by pointing a web browser to http://localhost:15672
Erlang Cookie
The documentation for RabbitMQ mentions that in order to connect a RabbitMQ cluster, all instances must share the same Erlang cookie. The cookie is a simple text file called .erlang.cookie that resides in your user folder (i.e. c:\Users\[UserName]). In order for the RabbitMQ Service to work, the same cookie-file must also be copied to your %WINDIR% (usually c:\Windows). All this is usually handled automatically by the installer and command line tools. However, there is one important gotcha. If you log on to the box with a new account, it will get a new Erlang cookie that doesn’t match the one that the RabbitMQ Service is running which means it won’t be able to administer the service. The easy solution is to copy the one in c:\Windows to the user directory for everyone who may want to use the RabbitMQ command line tools. We are probably going to set this up by pushing a login scripts to all users of the box.
(Windows) Firewall settings
This information is somewhat scattered in the RabbitMQ documentation, so here goes. You need the following things opened up:
| Port | |
|---|---|
| 5672 | This is the main AMQP port that clients use to talk to the broker. |
| 15672 | The management web interface. |
| 4369 | Used by EPMD (Erlang Port Mapper Daemon). This makes sure that the nodes can find each other. |
Finally, you also need to allow the Erlang runtime (erl.exe) to communicate between the nodes. You can either set a port range yourself in rabbitmq.config (inet_dist_listen_min and inet_dist_listen_max) and open up that range in the firewall, or you can do what we did and allow erl.exe to communicate freely. Note that the Erlang runtime installs two bin folders that both contain erl.exe. The one that seems to be used by the service is in the subdirectory named something like C:\Program Files\erl5.9.3.1\erts-5.9.3.1\bin
Joining a cluster
Creating and/or joining a cluster is actually the easiest bit. You just log on to one of the machines and issue these commands (if joining a cluster on RABBIT01):
rabbitmqctl stop_app
rabbitmqctl join_cluster rabbit@RABBIT01
rabbitmqctl start_app
NOTE that the host name of the server (RABBIT01 in this case) should be in UPPER CASE when working with Windows instances.
We decided to go with only disc nodes. Mostly because it doesn’t seem like using RAM nodes would be much of a performance gain anyway. But I may be completely off here..
Mirroring your queues
When the cluster is up and running, queues and exchanges can be created the same way you usually do. However, the queues will still be localized to a single box, and if that box fails the queue is gone. This is likely not what you want if the reason for clustering was to make things Highly Available.
In previous versions of RabbitMQ, a queue was mirrored by setting the “x-ha-policy” as an attribute when creating the queue. As of version 3.0, you now set the policies either using the management web interface or the command line tool:
rabbitmqctl set_policy ha-all "^ha\." "{""ha-mode"":""all""}"
The above line will create a new policy called “ha-all” (what you call it is not important), it matches all queues with a name starting with “ha.” (using a regular expression) and sets the ha-mode policy to all (which will mirror the queue to all nodes in the cluster).
Profit!
After getting everything up and running we started trying to break things. Mostly everything worked just as expected. When stopping the service on one machine (or completely shutting down the machine), the cluster recovered as expected. It is important to realize that messages that arrived in the cluster while a node is down won’t be mirrored to that node when it comes back up. So in a scenario where you need to restart all machines in a cluster, you should follow a procedure such as this:
- Restart node 1.
- Bring node 1 back to the cluster (usually does this automatically)
- Monitor your queues and wait until all unmirrored messages have been processed.
- Restart node 2.
- Etc, etc.
Please let me know if I’ve missed something crucial or if there are things you’d like to know more about!

Leave a comment